Friday, November 26, 2010

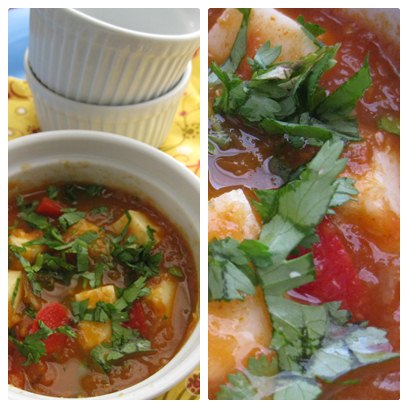
Malai Kofta

Pin It Now!
While this part of the world feasts on the turkey and the mashed potatoes we indulged ourselves in a very much indian Malai Kofta. It was one of those times where I attempted to replicate the restaurant like flavors at home. 
An internet search for the perfect recipe resulted in almost a hundred different variations of this classic dish. I took ideas from many of these and came up with my own.


The contents for the kofta are common in most recipes - paneer and potatoes. You can add some basic seasonings if you like. The tomato based curry is enriched with ground cashews and almonds.

Here's the recipe in detail :

For the koftas :
1/2 C paneer grated ( I used homemade)
1 medium potato ( cooked and grated )
pinch of salt ( dont add too much )
1 tsp green chillies finely chopped
1 large carrot grated (optional)
1/4 C green beans finely chopped
2 tbsp corn flour or all purpose flour
oil to deep fry


For the curry :-
7-8 tbsp tomato pure
2 tbsp cashews (soaked overnight)
2 tbsp almonds (soaked overnight)
1/2 onion chopped
1 inch ginger
2-3 cloves of garlic
2 tsp garam masala powder
1 tsp fennel powder
1 tsp cardamom powder
1 tsp sugar or honey
 salt to taste
1 tsp chilli powder
1 tsp turmeric powder
 oil for tempering

  • Make a paste of cashews and almonds and keep aside
  • Grind the onion with ginger and garlic and keep aside.
  • In a pan heat the oil and add the onion paste and saute till fragrant.
  • Then add the chilli powder and turmeric.
  • Add the tomato puree and stir on high heat till oil emerges at surface.
  • Add the cashew and almond paste.Add enough water to make gravy.
  • Once the gravy comes to a boil add the salt,fennel powder,honey,garam masala and the cardamom powder.
  • Taste and adjust more spices if you like.
  • If you want to thicken the gravy further add some whole milk or cream. 
  • Cook for a minute and the garnish with cilantro to serve. Add koftas just before serving.

I was actually quite pleased with this outcome. The gravy is creamy and slightly sweet. Serve it with rotis or a simple jeera rice to get the restaurant like experience at home. A perfect holiday indulgence to say the least.

Enjoy the rest of the weekend !

Sunday, November 21, 2010

Surti Val

Pin It Now!
Me in a grocery store is like a kid in a toy shop. The one who wants to touch, feel,smell and taste (if possible) all the intresting ingredients I find out there. But my better half does not share this curious behavior, at least in the grocery store. He's more of the go-getter kind. Head straight to the point of interest without looking either ways. On one such visit he happened to pick up this packet of surti val. I had listed the unpeeled ones but what I got were these....
They reminded me of the time when my mom would soak them and spend a good 1-2 hours peeling the skins. A tedious and time-consuming task so to speak. 
 After spending enough time languishing on the kitchen counter they finally got their due respect. I used up some of these in tangy,spicy curry. The recipe is inspired from this one on Aayi's recipes . 


Here's how i made it : 

Surti Val Curry
(Inspured by this recipe on Aayis Recipes)

Soak 1.5 C of surti val in water overnight
Pressure cook them (around 2 whistles) with some salt so that they are soft but still hold their shape.
(Take care not to overcook else you will end up with vaal paste !!)

For the spice paste:
3 cloves
1/2 inch cinnamon stick
1 tsp coriander seeds
1 tsp cumin seeds
3 cloves of garlic
3 dry red chillies
2 tsp cooked beans from above

1/2 onion finely chopped
1 tsp turmeric powder
1 tsp or more chilli powder
small lump of jaggery
 2-3 tsp tamarind paste
salt to taste
1 tsp mustard seeds
pinch of turmeric and hing
oil as required

  • Grind together the above into a smooth paste. Set aside.
  • In a pan heat 4-5 tbsp f oil. Drop the mustard seeds,curry leaves, hing and the onion. Fry for about a min.
  • Then add the spice paste, tamarind and the vaal. Mix everything adding water to get a gravy consitency. 
  • Season with salt. Add a lump of jaggery. Let the whole thing come to a rolling boil. 
  • Taste and adjust seasonong as required.
  • Garnish with cilantro.Serve with chappatis or plain rice. 

A delicious curry indeed !! And no we did not notice any after-taste because of the peel.....

Have a great week  ahead !!!

Sunday, November 14, 2010

Masaledar Ubley andey ( Egg Curry )

Pin It Now!
Though this place was quiet for sometime, my life had actually got all the more busier. The see-saw of my life kind of lost its equilibrium giving me more than I was prepared for. Diwali celebrations, extra hours at work, toddler's health all disrupted our routine for a few days. It wasn't that I was not cooking. In fact I was cooking more than usual. But somehow I was unable to grab my camera and take some shots. Nevertheless a part of me wanted to come back here and post a few lines.

Eggs - These find a place usually at our sunday lunch. Omlets,scramble,curry the combinations are endless. Easy to prepare, nutritious and Vijay loves them. Do I need any more reasons ?  I like to try a new recipe for eggs each time. This time I tried this one from Indian Simmer. Prerna gets it from Madhur Jaffrey's cook book. The recipe is very simple and can be assembled in 10-15 mins.

Here its goes :-

Masaledar Ubley Andey
(Inspired from this recipe at Indian Simmer)

4 hard boiled eggs
2 tsp coriander powder
2 tsp cumin powder(I did not have any so i skipped it)
2 tsp chilli powder
1 tsp turmeric powder
salt to taste
1 tbsp lemon juice
2 tsp garam masala ( the best you can find)
cilantro to garnish
1 tsp ginger grated
1 tsp cumin seeds
1 tsp sugar
1/2 an onion finely chopped
1 C tomato puree or 1/2 can of tomatoes or 2 regular tomatoes chopped ( I made puree of 2.5 tomatoes)
oil as required

  • Make a paste of lemon juice, coriander powder,cumin powder,chilli powder,turmeric,salt and garam masala. Add some water if required , but not too much.
  • Heat 2-3 tbsp of oil in kadai or wok. Add the cumin. 
  • Once the seeds sizzle add the onion and ginger and fry for sometime.
  • Add the spice paste.Let the oil separate and the mixture become lumpy.
  • Then add the tomato puree and sugar. Saute again. Taste and adjust seasoning.
  • To serve cut the eggs length wise and spoon the curry over it. Garnish with cilantro and serve.

The curry is sweet, spicy and tangy - all at the same time. We had ours with some homemade parathas.But these would go well with some bread also. Would be great in the lunch box too.

Have a great week ahead !

Wednesday, November 3, 2010

Halloween Pics

Pin It Now!
No recipe today. Just some pictures of Halloween last weekend. We visited a Halloween celebration in the neighbourhood.
The weather gods offered clear blue skies and bright sunny day.
And here is our toddler..
Enjoying the train ride...


Friday, October 29, 2010

Brown Rice Fried Rice

Pin It Now!
Here it is, as promised in my last post - my version of Brown rice fried rice. Its simple, quick and healthy -  everything that I ever want in a recipe.


Here are some of the secrets to Cooking the best Fried rice ( shortlisted from here ).I never realized that fried rice could be an object of so much research and analysis.
  • A day-old rice makes the best fried rice. Hot, steaming freshly cooked rice would end up in a mushy,sticky fried rice. An absolute no-no.  Refer to my earlier post on getting the perfectly cooked brown rice.
  • Wok Time. I learned this term from Jaden Hair ( from Steamy Kitchen). The rice and the veggies need their time in the wok. So instead of constant stirring and mixing, leave it alone for sometime and you will be rewarded.
  • Temperature - A hot wok/kadai is an absolute must. Wait patiently while the wok heats up so that you get your veggies crunchy.The trick as Jaden puts it - " The high heat ensures that each grain of rice gets hot to the core"
.

Brown Rice Fried Rice
( Inspired from this post )

1 C of uncooked short grain fried rice ( cooked as per the this post)
2 tbsp of ginger-garlic sauce (or sricha sauce or any other hot sauce)
2-3 cloves of finely minced garlic.
4-5 tbsp of oil
1C you choice of veggies - (peas,carrots, bell pepper any color,cabbage,corn,green beans)
If frozen thaw the veggies in hot water and then use.
salt to taste
2 tbsp of soy sauce
2-3 eggs scrambled (optional)
Spring Onions (for garnish, I did not have any though)
A wok to comfortably hold all of the rice and veggies.

  • Add the oil  and the garlic to the wok/kadhai. Let the oil get infused with the garlic and get smoking hot.
  • Then add the veggies and mix. Leave alone for 1 min or so. We want the veggies to stay crunchy.
  • Then add the sauces.Mix.
  • Then add the rice. Mix with the vegetable mixture. Spread it in the wok and let it SIT.The rice will start to sizzle.After about 1-2 min. Stir everything. Taste and add salt(if required).
  • You can add more sauce if the rice is too dry.
  • Optionally add scrambled egg.
Dig in ...
We enjoyed bowls of rice with a side of crunchy green beans. 

Its Halloween this weekend.  My little one will be trick or treating with mommy and her neighbourhood friends. Want to see him in his halloween costume ? Come back next week for some pics.

Have great weekend everyone !

Wednesday, October 27, 2010

Perfectly Cooked Brown Rice

Pin It Now!
All of us at home are big fans of rice. I L.O.V.E khichadis, biryanis and most things made of rice. If rice would not have been so carb-laden I would have happily spent my life eating just that.


While white rice is staple in most households irrespective of cuisine,brown rice is not so popular. Its rich in fiber and magnesium. So a small helping can keep you full for quite sometime.

Brown rice (or "hulled rice") is unmilled or partly milled rice, a kind of whole, natural grain. It has a mild nutty flavor, is chewier and more nutritious than white rice (Source Wikipidea)
More about why brown rice is healthier here.

There are several varieties of brown rice - short grain , long grain, medium grain,aromatic. Brown rice versions are also found in the popular varieties like Jasmine rice, arborio rice, basmati etc. I have used brown  basmati rice and short grain brown rice so far.

Selecting and Storing Brown rice

Brown rice gets rancid faster than white rice. I generally get a pound at a time since we have it once a week for lunch/dinner. Our current stock is the short grain brown rice from Whole Foods. Its a dollar more than the one at Walmart but so worth it. Also I can buy in smaller quantities without paying a dime for packaging. I store it in a plastic jar in a dry place along with the lentils etc. Keep away from moisture and it should last well.


Cooking brown rice
There are several ways to do this. I attempted 2-3 of them and have finally settled down on the following one. This method has never failed me, specially when I used it to make the rice for fried rice. 


1 C brown rice
4 C of water ( Yes, it in 1:4 ratio)
salt to taste
1 tbsp olive oil (optional)

  • Wash the rice several time with water. Place it into a big pot / rice cooker with the salt and olive oil. 
  • I do mine in a electric rice cooker.
  • Let it come to a boil. This will take around 20-25min.
  • Check to see if its tender and cooked. If not give it another 5-10 min.
  • Else drain the whole thing into a colander. 
  • Then put the rice back into the cooker and cover with a tight lid.Switch off the cooker.
  • Leave it alone for 10min or more. Fluff with fork and use.

Apparently this method is very versatile and would work for most brands and varieties of rice. No guesswork on how the rice would turn out. I used it to make the rice for my fried rice. You guessed it, that's coming up in the next post.


Wednesday, October 20, 2010

Aamrakhand From Scratch

Pin It Now!
Dassera (Dussera) is one of the most auspicious days according to the Hindu Calender. I recall my aai making an elaborate lunch on that day - batata bhaij, pakoras, puris,.. the list was long. We girls contributed by making hot puffed puris. These would then be used to scoop some cool Amrakhand.
I made some Aamrakhand last weekend as a part of the puja meal.


This is a very easy to make dessert with not much scope for mistakes.


Aamrakhand 
(Printable version of recipe here)

What's needed :-
1 32oz can of full fat yogurt ( I used readymade Dannon yogurt but homemade would work great too)
1/2 C or more of alphonso mango pulp
1 C sugar
1tsp cardamom powder
 walnuts or other chopped nuts to garnish
  • Scoop the yogurt into a muslin cloth and tie the ends. Then hang it up so that it drains out the water. I have seen friends hanging it to the handle of kitchen cabinet or to a chair (similar to hanging paneer). Just ensure that its high enough so that the whole thing does not sit in its own whey.Overnnight is the best but 7-8 hours would also work.
  • Transfer the thick yogurt into a bowl. Add the sugar,cardamom and the mango pulp. Mix until smooth and there are no lumps.Taste and adjust sweetness. If you use homemade yogurt that is slightly sour you might need more sugar.
  • Then decorate with nuts and serve !

It had been quite a while since I made a traditional maharashtrian dessert. So we enjoyed every spoonful to the fullest.
 *********************

And what's up with the toddler these days ? Here have a look.....

Yes,he plundered mommy's purse..And BTW,someone else got to wear my sunglasses too...


Wednesday, October 13, 2010

Achari Aloo

Pin It Now!
The most versatile vegetable in my (or in most) household(s) is unmistakenly the chubby potato. Red or white potatoes always have their place in my crisper. They readily lend themselves during times when nothing else seem intresting. Dress them up in a rich curry or dress down into a simple stir fry they are perfect in every way. 
This weekend was one such instance when nothing much was planned on the kitchenfront. I poked the fridge and there they were - my potatoes, waiting patiently for their turn. 
A quick look at my bookmarks folder and I decided on making Meeta's Achari Aloo - a super simple bhaji to fit a  weekend lunch.

Here's how I made it :

Achari Aloo
(Inspired from this recipe at What's For Lunch Honey )
Printable version of recipe is here

3 medium sized potatoes cut in 1 inch wedges
2 medium sized tomatoes chopped
4-5 sticks of spring onions chopped (green and white parts) or 1 medium onion sliced
2-3 tbsp mango pickle ( I used Priya's Mango Thokku pickle )
salt to taste
squeeze of lime juice (optional)
2 tbsp of oil

  • Heat 2-3 tbsp of oil in a non-stick wok.
  • Add the onions and turmeric. Fry for a min or so.
  • Then add the tomatoes and fry till the whole mixture is mushy.
  • Then add the potatoes with a splash of water.Cover and cook till potatoes are tender but not mushy. I like my potatoes to be slightly cruncht rather than very soft.
  • Then mix in the mango pickle.Since the potatoes take on the flavor of the pickle ensure that you use a good quality pickle - something that you actually like. Homemade or the one "smuggled" from India would be perfect.
  • Add salt and pepper and give the whole thing a good stir.
  • Add a handful of cilantro (I did not have any) or some more of spring onions for garnish.
  • Serve warm.

We had ours with some fresh rotis.and a cucumber-yogurt salad. Both of us enjoyed this new twist. I for one enjoyed its simplicity. Would be perfect for a picnic with some parathas or as a sidedish for potlucks.

Sunday, October 10, 2010

Sweet comforts....

Pin It Now!
If you are a yogurt lover (like me) then read on....

I was actually a yogurt hater until I moved to US. I never liked the yogurt(curd) in India. My sister and myself detested the sour smell. We disliked all things made with it. So the neighborhood chaat-wala got strict instructions to make our sev-puri without it. And if by chance he forgot, the plate was promptly returned with "eeeee this has dahi.. make us another one..".

The yogurt tubs sold here are different though. They are thick and creamy devoid of the sour smell. So I liked it instantly. But I missed the sourness of homemade yogurt in my koshimbirs and kadhis. That was when I borrowed a yogurt culture from a friend and made my first homemade yogurt. Ever since I have churned batches of yogurt every other week.Its healthy, fresh and generates no plastic waste, and more importantly its way cheaper.
A few weeks back I read this post on this blog. The pictures got me drooling too. And finally I made us some  Mishti Doi(Sweet Yogurt). Its a very sweet and comforting dessert, perfect after a nice home-cooked meal.

The recipe is very simple and uses regular pantry ingredients and the results are outstanding.Its traditionally made in earthenware so that the gradual evaporation of water through the holes thickens the yogurt. But ramekins or any other container can also be used.


Mishti Doi 
( Inspired by this recipe )

What's needed :

2 1/2C Whole milk ( No 2%,1% please.It wont be as good)
1/4C+1/4C+2 tbsp white sugar (do not replace with brown sugar)
1 1/2 tsp cardamom powder
1 tbsp of yogurt culture
crushed pistachios to garnish (optional)

How to -
  • Start by heating the milk.
  • Once it warms up add the 1/4C of sugar and  the cardamom.Give it a good stir.Keep warm.
  • In another heavy bottomed pan add the 1/4C +2tbsp sugar. Bring the heat to high and stir so that sugar does not burn.
  • After a while the sugar will start browning and will turn into a syrup. Keep stirring till it gets a nice brown color, like caramel.Add 1tbsp of water and let the whole thing come to a rolling boil.
  • If at anytime the sugar solidifies boil the mixture for sometime and it will melt.
  • Add  this to the boiling milk and stir.Watch for spluttering though.
  • Cool the milk until a finger can easily withstand its heat. 
  • Mix in the yogurt culture.
  • Transfer to earthen pot or to individual ramekins.Cover with foil and set aside in a warm place. I put mine in the oven with the oven light on at night. Switched it off in the morning.
  • Move them to the fridge in the evening where the yogurt will continue to firm further.
  • Decorate with pistachios (or any other nuts) and enjoy.
It tasted best a day after it sets in fridge. Though we could not wait that long to taste it. Both Aamod and Vijay enjoyed it by the spoonfuls.
******
And finally.....
To all the readers celebrating Navratri, Happy Navratri !!

Monday, October 4, 2010

Crispy Chivda

Pin It Now!
Come October - November and we begin planning talking about Diwali and about Diwali "faral"(sweets and snacks). Aai (mom in marathi) always talked to us about what and how she will be making the faral . "This time I will try out xxx recipe for chakali.." she would say. It did not mean much to me back then..However today those words resonate clearly in my ears.
Aai makes most of the traditional items on menu - ladu,chakli and the crispiest chivda in the neighbourhood. In fact its still the most-wanted item by many of the guests at our place.

Why this sudden talk about her ? Because she celebrates her birthday this week. I did wish her on phone but nothing beats that warm hug. So I spent the weekend reminiscing about her and making some crispy chivda.

Here's how I make it : -

6C of flattened thin poha (available in Indian grocery stores)
1C of puffed rice (murmura)

For the tempering :
4 green chillies chopped ( add more for a spicier version)
1 heaped tbsp ginger-garlic paste ( fresh is the best )
10  curry leaves
2 tbsp powdered sugar ( can be omitted, but I like my chivda to be sweet n spicy so I add it)
2 tsp chivda masala ( available in Indian store. Replace with a mix of 1 tbsp coriander powder + 1tbsp jeera powder)
6 tbsp dalia
6 tbsp or more of peanuts or cashewnuts
1/2 an onion cut into thin strips
1tsp fennel seeds
hing - a pinch
3 tsp  mustard seeds
1 tsp turmeric powder
salt to taste and 1/2 C vegetable or canola oil to fry

1. Add the poha and the puffed rice to a heavy bottomed pan and roast on low flame stirring every once in a while. Make sure the pohe does not burn else reduce the heat even further. We want the pohe to be warm and loose its moisture to get the desired level of crispiness. Keep warm till we make the tadka.
I have heard friends doing this in the oven but I prefer doing it on the stove top since its easier to manage the heat.  Also I do not need to open and close the oven every time I need to check on it.

2.  After about 15-20mins taste some of the above mixture. If it still feels a little chewy continue it for 10 more minutes. Stir gently so as not break the pohe. After about 30-40 min the mixture will taste crunchy. Keep warm.

3. In another pan heat oil to make a tadka. Add mustard seeds. When these splutter add the onions and ginger-garlic paste. Deep fry till brown. Now add the curry leaves and hing. Watch for spluttering again. Add the dalia, peanuts,green chillies and fry for about 2-3 min.

4. Now add the spice powders - turmeric,chivda masala, fennel seeds and fry for about 1 min and then switch off the stove. Let the masalas continue cooking for 1-2 minutes till they lose their raw smell.

 5. To the pohe and puffed rice mixture add the salt and sugar and mix gently.Add the tadka and again mix gently so that the pohe are covered with the tadka. Taste and adjust salt and sugar levels. Do not overmix, since it might break the pohe.

A crispy chiwda is ready to be savored. The above measurements here are approximate. Feel free to adjust them to your spice level. I would not recommend using olive oil here since it tends to imparts a fake stale smell to the fresh chivda. If the chivda seems dry add some more tadka this time with some turmeric only. Do not cover until completely cooled though.

My favorite way to have it is with some store-bought farsan or sev, with some finely chopped onion.tomato,lots of fresh cilantro and squeeze of lime. Store in air-tight container.Keeps for about 15-20 days.

Friday, October 1, 2010

Agnolotti with Roasted Red Peppers , Sundried tomato and almond sauce

Pin It Now!
Winter made a short appearance here in Houston and went away. And the long summer refuses to end. I am so looking forward crisp, clean and light air. Would be a nice change from the high humidity and warm weather we have experienced so far.
A few weeks back I bookmarked this recipe on eCurry that seemed perfect for a cold winter night. So I pretended its winter and gave it a go.
We are not really a pasta-eating family. Most of the pasta recipes are less pasta and more cheese.
I had never tried any stuffed pasta earlier. So this recipe was new to me in many ways. The sauce itself is a combination of smoky charred red peppers and sweet, tangy sun-dried tomatoes. The almonds adding a nice crunch and adding to the thickness. The recipe used saffron but I did not use any.

The wild mushroom, cheese stuffing along with the roasted garlic pairs up very well with the chunky sauce. 

Now, onto the recipe : -

Agnolotti with Sun-dried tomatoes, Red Peppers and Almonds ( inspired from this recipe at eCurry)
Printable version of the recipe here

10-12 sun-dried tomatoes (ours come from the jar sold at Costco)
2 large roasted red bell peppers ( i roasted fresh peppers in oven for 30 min, cut side up. Then transfer to a bowl and cover tight. Once cooled, peel the skins and use)
10-12 almond coursely ground
4 garlic cloves

1 packet stuffed Agnolotti (preferrably Buitonni)
salt and pepper to taste
2-3 tbsp olive oil
2 dry chillies crushed roughly
3-4 tbsp red wine ( omit if making for kids)
1 tbsp dry rosemary (optional)
1/2 onion chopped roughly

How to : -
  • Cook the pasta with lots of water and a tablespoon of olive oil for 4-6 min or as per packet instruction. Olive oil ensures that pasta does not stick together.
  •  To make the pasta sauce
  • In a blender blend the sun-dried tomatoes and roasted red-peppers along with 2 tbsp of olive oil. Add some water if mixture looks 2 dry. The sauce should be chunky rather than a smooth paste.Set aside.
  • In another  pan heat some olive oil. Add the garlic pieces. Once oil is garlicky fragrant, add the onions and saute till translucent.
  • Then add the wine(if using) and then the crushed dry chillies. Once the wine is cooked out, add the sauce and the almonds.  Saute for another 2-3 min.
  • Finally add the pasta and the rosemary. Do not cook for long else the pasta might break.
  • Serve warm with a salad and garlic bread.

When I saw the packet of pasta I was skeptical if it would be enough for 2 adult portions. But we found the pasta very filling. And I must say that leftovers were really tasty. We enjoed the pasta dinner and there were 3 happy faces at the end. No, the toddler did not get the pasta. He was happy with the garlic bread.:)

Sending this to Nupur's Blog Bites Event. This month's theme is One Pot Meals.


Monday, September 27, 2010

Savoury Snack - Kothimbir Wadi

Pin It Now!
I love the way the Indian cuisine has all the elements of a complete meal. In the sense there is the spicy bhaji (vegetable) , the comforting varan-bhat and the crunchies like papads, wadis. Kothimbir or cilantro wadi is an all-time favourite with us, Maharashtrians.
A few weeks back we were invited for tea at a friends place. Her mom had made her version of cilantro wadi and was really kind to share the recipe with me. I tried this at home and it was liked by everyone (yes, that includes the toddler).
The first time I tried it another friend (you know who you are) dropped in. She requested the recipe sometime back. Here is the recipe for you dear friend.
Kothimbir Wadi 
Printable version of recipe here

What you need : -
5-6 C of cilantro leaves finely chopped ( measure before washing and chopping)
1C + a little bit more of chickpea flour
5 tbsp rice flour
2 tsp ginger-garlic paste
2 green chillies finely minced
2 tsp chilli powder
1 tsp turmeric
2 tsp sugar
juice of 1 lemon (dont skip this)
sesame seeds for garnish
oil to fry.
salt to taste
water as required

How To:-
  • In a bowl mix together cilantro, ginger-garlic paste,chillies,salt, chilli powder, turmeric, sugar and lemon juice. Mix with finger tips so that the cilantro is covered with the mixture.

  • Now add the chickpea flour and the rice flour. Add water little by little stirring so that the there are no lumps.

  • Taste and adjust seasoning.It should be slightly sour, sweet and somewhat spicy. Add more salt and other spices if required.

  • The mixture should be like a batter for bhajis(fritters). Add more flour if required. When you try to drop it with a spoon it should go drip, drip,drip. We will now cook this mixture in a pan.

  • In a non-stick kadai heat 3 tbsp of oil. When it heats up add a pinch of asafoetida(hing) and let it sizzle. Then add the chickpea mixture to it. There might be spluttering so watch out.

  • Keep stirring this mixture so that there are no lumps. It will start coming together. Scrape the sides of  the kadai if the batter sticks to it.Simmer and cover and cook for 5-7 min. At this stage the  mixture will be an unruly mass that is difficult to handle. Keep at it and it will all scrape and come together. Be prepared for a serious arm workout.:)
  • Uncover and taste. If the mixture has cooked there will be no raw smell and taste.Allow to cool.
  • When mixture is warm enough to handle drop it onto a flat plate lined with oil.
 
  • Spread it and press firmly. Spread some seasame seeds if you like
Cut into squares.Shallow fry these squares. Serve with ketchup.

When hot, the wadis will be delicate to handle. They will harden a bit when cooled slightly.

At first the recipe may seem a bit lengthy and complicated. But its actually not. I found the recipe very versatle and forgiving in terms of the ratios of the ingredients. The cut wadis can be refridgerated and fried at a later stage. I ususally make a big batch that I can shallow fry later.
And like I said earlier,the two men in the house could not get their hands off it, specially the older one. Very very addicting.....

Saturday, September 18, 2010

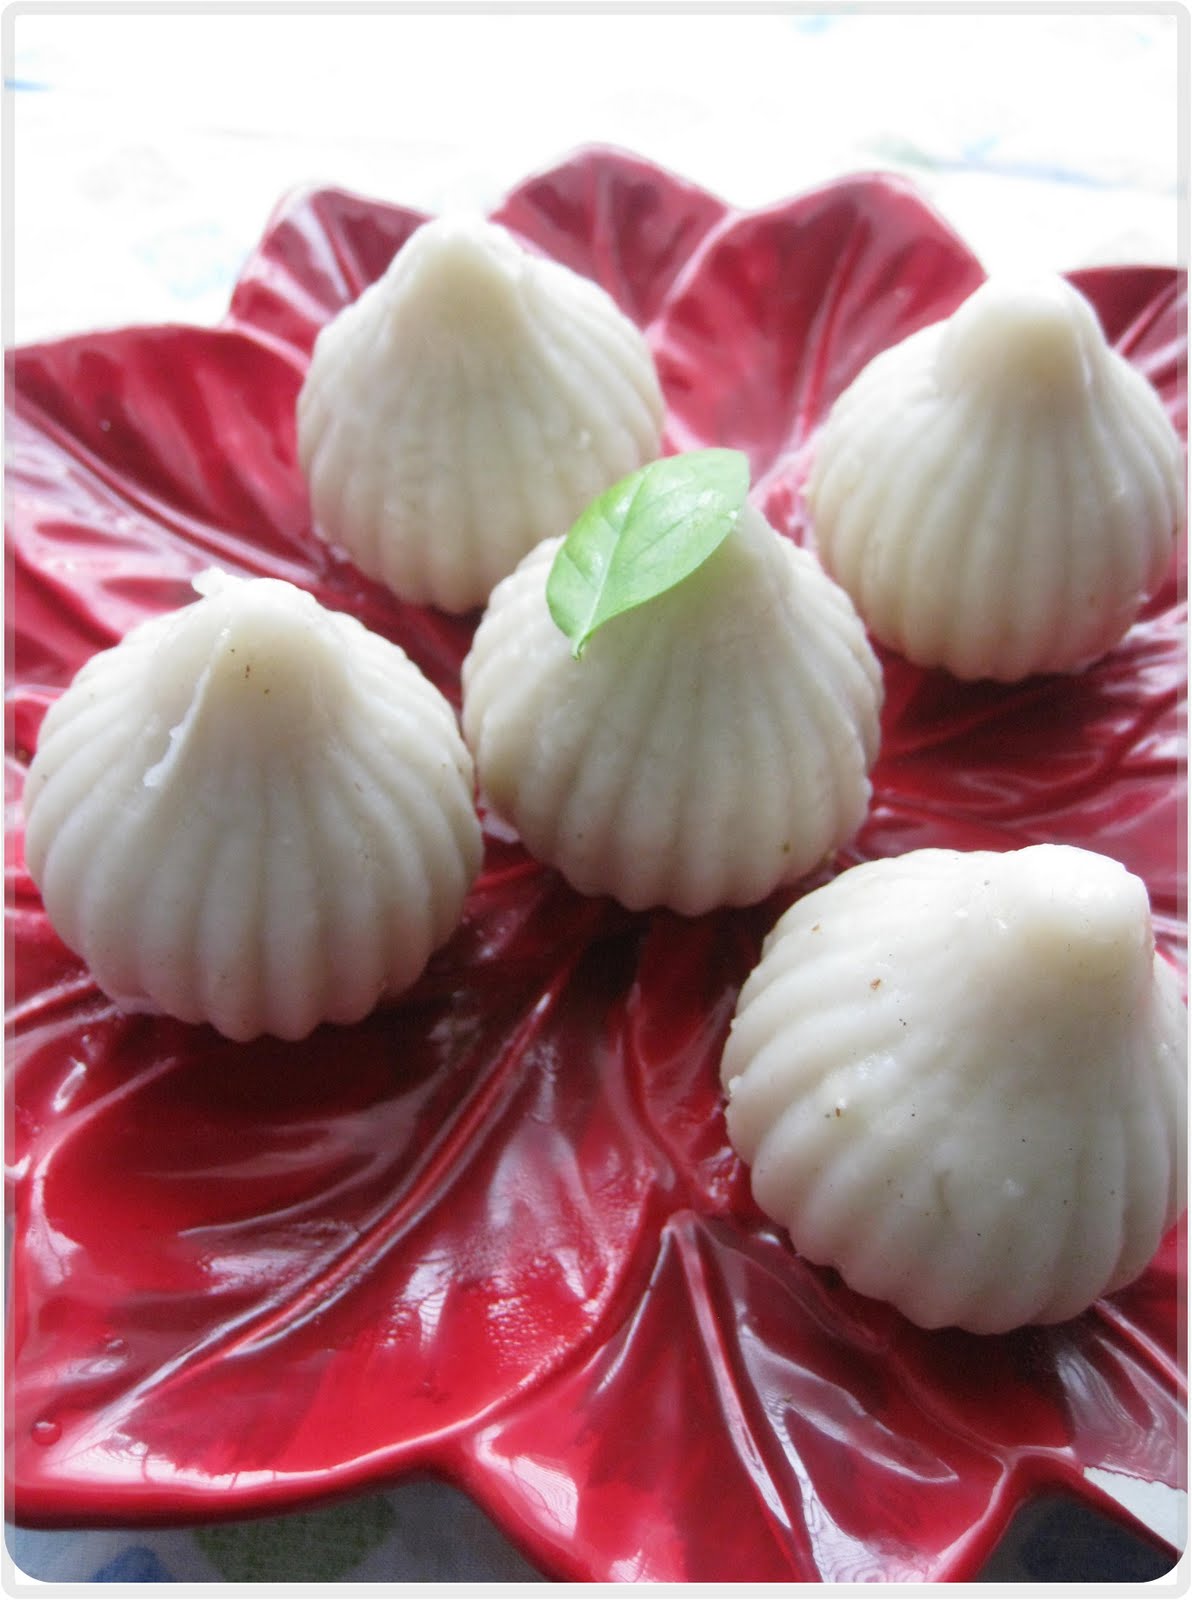
Modak for Ganpati Bappa

Pin It Now!
Every year this time I want to be home, in Pune, amidst the Ganpati festival, participating in the evening aarti and enjoying mom-made modaks with dollops of ghee. My sister and I were the prep-cooks in the house and along the way we got some very useful cooking lessons.

 Army of Modaks .....
'Ukdiche modaks' was one of things my mom and we sisters learned together. When aai learned that a neighbour aaji makes fabulous ukdiche modak she immediately asked her to demonstrate it. Neighbour aaji oblidged and we tried it together in our kitchen. Then one day we saw these things a.k.a moulds in TulsiBagh ( shopping market in Pune ). They looked unusual and did not come with any instructions on how to use them.

Modaks in the making.....
 Anyways since it was only a few bucks we bought it. And then got working on it in the kitchen. After a few attempts we were finally able to churn out a perfect modak.

 Ready to be steamed
 I make them at least once during the 10 days when Bappa is home. My way of saying thank you.

Modak for Ganpati Bappa
 Ganpati Bappa !! Morya !!!

Tuesday, September 14, 2010

Paneer in Tomato Gravy

Pin It Now!
It feels somewhat magical to me - last year this time Aamod was a 5 month old who was trying his best to roll over and begin to crawl. A year later he is a running toddler, his innocent baby smiles being taken over by naughty grins. His hugs, his smiles and his laughter - arent they too adorable at this stage ? .
In between the tantrums and giggles I found myself making this recipe for a leisurely sunday lunch. I have made this earlier and it was appreciated very much by him. So i made it again , enough for us to last through sunday and in the lunchboxes on monday. 


Here's how I made it : -


Paneer in Tomato Gravy (Inspired by this recipe on Sunita's World)

What's needed (serves 4 adult portions):
4-6 tomatoes
 1 small onion chopped ( blended with 2 clove of garlic and 1" piece of ginger)
1C paneer cubes
 whole spices - 1 stick cinnamon.2 bay leaves, 3 cardamom pods,2 cloves
1  bay leaf for tadka
salt to taste
1 tsp cumin seeds
1 whole red chilli
2 tsp chilli powder
2 tsp garam masala
oil as required
cilantro to garnish
2-3 C water


  • Boil water and throw in tomatoes along with the whole spices. Let the tomatoes boil until tender. After a while the whole mixture will release a wonderful aroma from the cinnamon,cardamom etc
  • When tomatoes are tender, allow to cool and blend the entire mixture along with the whole spices.
  • In a pan , heat some oil. To it add cumin seeds.When they splutter add the 3rd bay leaf and whole red chilli.
  • Add the onion+ginger-garlic paste. Saute till onion loses its raw smell and the mixture dries up. Add the chilli powder,turmeric.
  • Now add the tomato mixture. Watch for spluttering here though. Mix well. and allow mixture to simmer for a while.
  •  Add garam masala and the paneer . Taste and adjust seasoning.Garnish with cilantro and serve.
The infusion of tomatoes with the whole spices flavours the gravy from within.. I also added some red peppers along with the onions. That's not in the recipe though. Makes for a great weekend meal !
 

Wednesday, September 8, 2010

Aloo Sag

Pin It Now! I have been gone from this space for a while. Demands at work and the growing needs (read as attention) of a 17 month old toddler. And so this little space took a backseat. But now am back. :) With this delicious Aloo Saag recipe.
The other day I impulsively bought a large bag of spinach from Costco. It was HUGE !.And then fortunately I found this recipe of Saag Paneer on Jugalbandi. I did not have any paneer so I replaced it with shallow-fried potatoes. Awesome !!

For one, I did not feel guilty about eating a rich curry. Coz its green - good and good for you. The aroma of the fennel and creamy-ness from the cashew powder makes it very different from any other curry I had earlier. I replaced the cream with the a 1/4C of whole milk.
With some warm rotis,salad and rice this makes for some tasty meal. It tastes better the next day so do make enough.
On to the recipe :-
The recipe is elaborate but definitely worth it. I usually make enough for 3 meals for 2.

Aloo Sag ( Inspired by this recipe on Jugalbandi )
  • Drop about 5-6C of loosely packed spinach leaves into the biggest pot with boiling water. Let it sit for 10 min until leaves have wilted. Rinse with cold water ,drain and keep aside.
  • Finely chop 1 large onion. Reserve half of it. Cover the other half and microwave till it softens (about 1 min)
  • Add this onion to the spinach along with  - 1 green chilly,1/2 tsp fennel seeds(saunf), handful of cilantro
  • Drop 2 tomatoes in another pot of boiling water and let sit for 10 min. Dunk them in cold water. Peel skins and grate/puree.Set aside.
  • Make a 3rd paste - 1/2 onion cut  earlier + 2 cloves of garlic + 1/2inch ginger.
  • Grind the foll. to course powder - 1 tsp coriander seeds + 1 tsp cumin seeds + 1 clove + pinch of turmeric + 1/2 tsp chilli powder.
  • Finely grind 1/4C of cashews.
If you have all the above pastes ready let's assemble the final dish.

  • In a pan heat some oil + butter.
  • Add the onion-ginger-garlic-paste.Fry for 2-3min.
  • Then add the tomato puree and the spice powder (coriander,fennel etc). Saute till most of moisture evaporates and mixture becomes thick. 
  • Add cashew powder and mix well.
  • Then add the spinach paste. If the whole things splutters cover with lid. If you find the mixture too thick add some water/stock. Check for seasoning.
  •  Then add 1/4 C whole milk. Incorporate it well into the mixture. Simmer at this stage so that milk does'nt curdle.

Shallow Fried Potatoes

 1-2 potatoes sliced
 salt + oil to fry

  •  Heat some oil in a saute pan. When its hot add the potatoes. Take care that the potatoes are not over-crowded in pan. If so do saute them in batches. Leave them alone for 5 min
  •  They will take a nice golden color. Add a splash of water and cover and cook till just cooked but not mushy.
  •  Add them to the sag just before serving.
  • Serve with warm rotis and rice.
The recipe also included a tiny bit of nutmeg. I omitted it. Somehow my previous experience of combining spinach,nutmeg and milk was'nt so great. Add it if you like. BTW did you know a tiny bit of nutmeg can give you a good night's sleep ?