Thursday, November 8, 2012

Some Parenting Experiences

Pin It Now! This post is really close to my heart. It notes my first few wobbly footsteps into parenting, the little things that have made so much difference in cultivating the relationship that i have with my son.
At his 18 month checkup the pediatrician asked us if Aamod speaks at least 20 words. V and I looked at each other and could remember barely five. "He should talk at least 20 within the next 3-4 months" she told us. We left with lots of questions with even more answers to find. In the subsequent months we tried our best to get him to talk without much success. We tried withholding objects. showed him baby Einstein videos, sang nursery rhymes and so on. But in our hearts we knew it wasn't working. We were missing something.   And as expected at the 2 year checkup the doctor advised us to take him to a speech therapist. In the following weeks we learned that the therapy sessions costed a bomb - around 100 bucks just to play with a child,I thought. Meanwhile we received lots of support from friends, several consolations and options. Finally i decided to tackle it in my own way.
Everyday i would set aside an hour or more to play and communicate with him. We talked to him in short sentences and asked him yes or no.The first few times he would only nod his head or reach for the object.
I got several toys that were aimed to have fun with him. Toys that would promote communication, thinking and evoke response from him. Like the simple water bubbles, ball, counting match sticks, puzzles. We repeated words several times before him during the play.At first he was apprehensive but slowly we started getting one word answers from him. That was our first victory. Thereafter we started talking to him in short 2-3 word sentences giving him options to choose. .He started understanding them and following them . We had found our mojo and now there was no stopping.This exercise got us closer to him then ever before.

The other day when I was reading The happiest toddler book I found several of the strategies that i had implemented from above experience.These were general strategies that would make your life with your toddler a beautiful experience.


  • First one was the fast food strategy as the book calls it. If the child is upset or is just chatting with you then repeat his/her words once he has finished. Just like at a fast food restaurant does after taking your order. They repeat it for you. Doing just this will help him/her understand that you get what he is saying and his little mind loves that. This trick is specially true when the child is upset at you or is trying to get your attention. Most of the throwing, screaming and whining in kids is to make the parent understand how upset the child is.
  • Talk to kids in short sentences, that they can understand. Kids have smaller minds and they cannot process a whole of words thrown at them. However if you ask them things like "Aamod breakfast ?" " Cereal or toast"  or creatively make up the words in your own language chances are they will be understood and received well by the toddler. 
  • The book also talks about this powerful tool of negotiations  I love this one and i have used this to avoid so many tantrums. For instance if the child refuses to eat A and wants B. Then i ask him to have one morsel of A and then 1 morself of B. Thereby creating a win-win situation for both or he gets none of it. This is an art that may take time to master and initially you may win only 10% of it but slowly you will make it work so that you get 50%  of the share. Believe me it works in things like controlling the TV time, getting him to bed, cleaning up and more.
  • Then there are the yellow,green and red light behaviors  Ones that you can tolerate, some that are sometimes ok and the red ones are complete no-no. Its up to individual preference to decide what is ok to do at home and what is completely forbidden. Actions that harm the child or any one else are termed as red-light behavior. You can use the strategies like timeout, taking away a favorite item as a means to control this behavior. Yes, there will whining and an hour of crying at first but the next time the child will be reminded and chances are that he will not repeat it.
  • One thing that has worked several times for me is the power of hugs, physical proximity and praise. Its not just important to have love in your heart it is important to also show it. Since i do work full time I get 4-5 hour of everning time with Aamod. When preparing dinner i put him on a safe spot in the kitchen counter and chat with him. Give him some cilantro to pluck the leaves or just some Tupperware to play with. Even when he's watching some mickey mouse videos i ask him what is mickey mouse doing or what color is the clubhouse. And then repeat his answers to confirm. We do a lot of hugs and praise at bedtime to show our affection. I realized the more i show interest in his world and get him into mine the more connected he feels with me. 
And all of the when put-together helps keeping things sane in the Apte household. :)  Now its your turn. Have similar things helped you in bonding with your toddler ??

On a different note,Yes, I know the food has gone missing on this food blog. Next post will definitely have some, i promise.

Monday, October 29, 2012

This and that's of my life..

Pin It Now! Hello ! Is anyone here ? This space had almost lost hope of a post from me. But i love this space. Because it welcomes me every time I come here. Without any ifs and buts. Its there listening , waiting for me - to pen down my thoughts, and all what's going on around me. And there's lots !!
  • Its Halloween time and part of the year that makes me the happiest. All the Indian and western festivals lined up. We at home are all set for Halloween party at Aamod's school. I volunteered to make some treat bags. I made them using these cute pumpkin craft on Martha Stewart's website. The little ones been telling everyone that "we are having lots and lots of pumpkins at home".. :) If you need any more details for the goodie pumpkins leave me a comment and i can post it for you. But its really easy. All you need are some pipe-cleaners and some orange colored paper napkins.
 
  • We are giving in to the gorgeous weather we are having here. Trying to spend the evenings in the park and weekends visiting what else but pumpkin patches. We spent last weekend at Dewberry Farms. The little one enjoyed the hay rides, pony rides and all the activities. This place does not have lot of options for vegetarian food so its better to pack a picnic lunch if you plan to visit it soon.  
  • I created an account on pinterest last month and what can i say- am hooked. I am learning a lot of new recipes, time and money saving tips and tricks and a whole lot of DIY. I have created 3 boards and pinned a few brilliant ideas - come over and have a look. My id - suparna shaligram.
  • I happened to spend some time at the local barnes and nobles bookstore where i found this book- The happiest toddler book by Dr Harvey Karp. I ordered it from the local library. It has lots of strategies to deal with kids emotions early childhood years. I found that I was unknowingly implementing parts of the suggested strategies but it was good to confirm and understand more about them. As our families get nuclear its a welcome reassurance.Its a good read for anyone having growing kids.
That's what's up with me. I have lots more planned for the coming weeks. 
Will keep you posted. :)


Saturday, June 30, 2012

Simplified Idlis

Pin It Now!
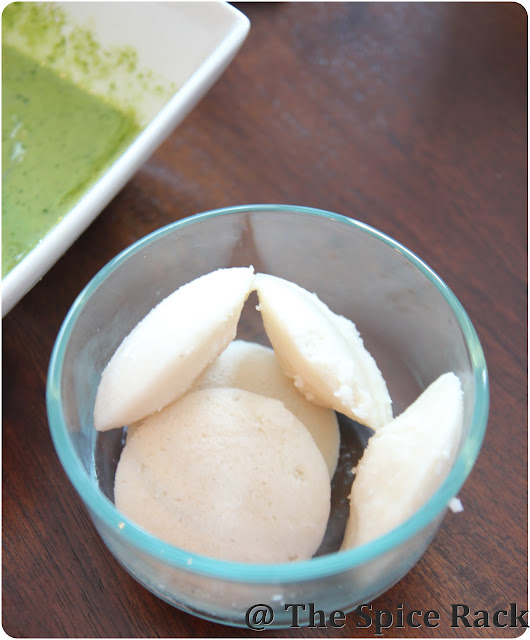
Yes, you heard me right. Simplified Idlis. Super soft and fluffy idlis without the soaking and tedious grinding.
For almost a year now, i have been buying this packet called "Idli Podi" from the indian grocery store. The packet instructions only say this - Mix in water and allow to ferment. Add a cup of boiled rice to get supersoft idlis. And that's it.
And the result is supersoft and fluffy idlis without the soaking and tedious grinding. There are similar "Podis" avalaible for dosas too. They are good too.


To go with that I made Green chutney using this recipe. The chutney is silky smooth with a perfect coconut-y touch.

Simplified Idlis using Idli Podi

2C of idli podi
1-1.5 C of water 
1/2 C of boiled rice paste (leftover rice perfectly ok)
a handful of poha ( optional )

Make a paste of poha and boiled rice in a blender. Its ok if you have a coarse paste.
Mix the podi with water and above mixture.
Allow to ferment for at least 12 hours in summer. Do not cover with a plate. Instead cover loosely with a foil by leaving some of the foil ajar. 


To make Idlis :-
Take 1 C of batter in a bowl. 
Add a pinch of baking soda and pinch of salt.
Add 1/2 C of water to make the batter of pouring consistency.
Pour into idli moulds.
Steam for 10-11 min.
Cool for 5 min and then unmould.


Other notes :- 
Take care not to open the cover while steaming before 10min. If you do the fluffed up idlis might spring back and you will get hard idlis.
Make sure the batter is of pouring consistency not too loose and not too thick. If its too thick then idlis will be harder, in that case try reducing the steam time by a minute.
Unmould with a wet knife by running the knife underneath the idlis. 
Serve hot with chutney or sambhar of your choice.

Additional time may be required in winter to achieve desired fermentation. I will generally use my gas oven, warming it by keeping the light on.
I was amazed to discover that these idlis are so similar to the ones made from stone-ground idli batter. Now i do not need to buy $300 worth stone grinder for sometime at least. And BTW I would strongly advice to put in the boiled rice paste since it gives the yeast something to much on and the batter ferments faster.

Now onto the chutney recipe.

South Indian Green Chutney
(Inspired from this recipe)
2C of cilantro washed and coursely chopped
1 green chilly or more for a spicier version
handful of roasted peanuts
salt to taste

Blend the above until you get a thick paste
To this paste add 1/2C of thick coconut milk. And blend again. Transfer to a bowl and prepare the tempering.

For tempering :-
1 tsp mustard seeds
1 tsp urad daal
1 red chilly ( optional )
a few curry leaves

Fry the above the 2 tsp of oil and add it to the above mixture. 
Add a squeeze of lemon juice. And serve.

The chutney takes on this lovely green color and has subtle taste from the roasted urad daal with the heat from the green chilly in the forefront.Goes very well with the kids and is perfect make-ahead recipe. And of course,this chutney coupled with the idlis would make a perfect picnic brunch.


Sunday, May 20, 2012

Tamatar Ka Saalan

Pin It Now!
And here comes another lazy Sunday afternoon. While the rest of the family takes a quick siesta I grab my laptop,settle myself on my comfortable sofa to have a chat with you. 

My recent weekends  have been busy with lots of homekeeping tasks. Chores that I have put off for sometime are slowly being given their deserved attention. That includes the small veggie patch in our backyard. We fertilized it a few weeks back and its now giving us lots of summer bounty. We planted some small, easy to grow pepper plants - jalepenos, thai chilli peppers and habaneros. 

 Little wild rabbits had been raiding these little plants and feasting on the tender fruits.The little one is having fun in the yard - regularly flooding watering the plants,plucking the flowers,fruits and running behind the "sasa" (rabbit). Here he is posing for a quick photo before he starts running again... :)

 On kitchen front, last week I brought home a box of cherry tomatoes. Yes, it was an impulsive purchase because the price on them was oh-so-irresistable.


After ignoring them for a week I tackled them using this recipe for tomato salan. 


Tamatar Ka Salan
( Inspired from this recipe on Zaiqa)

12 cherry tomatoes ( Make a cross on top of them without cutting them completely )
1/2 onion diced fine
2-3 cloves of garlic minced
1 tbsp ginger paste
extract from a lemon sized ball of tamarind
cilantro to garnish

Masala paste :
2 tbsp each of poppy seeds, sesame seeds, dessicated coconut.
1 tbsp of coriander seeds

For tempering :
1 tsp of mustard seeds, cumin seeds, nigella seeds
2 tsp chilli powder 
2 tsp of your favorite garam masala ( or substitute with equal parts of coriander and cumin powder )
10-12 curry leaves
pinch of hing

How to :-
Place all the ingredients for masala paste in a blender and make a fine paste. Do not add too much water. Just enough to make a paste.
Over medium heat combine the curry leaves, mustard , cumin and nigells seeds. Wait till the mustard splutters.
Add the onion, ginger and garlic. Saute till onion is soft.
Add the chilli powder, garam masala and the masala paste. If the mixture is too dry and sticks to the pan add a little bit of water. We need to cook the raw masala paste.
Add the tamarind extract and a cup of water. Cover and cook for 4-5 min until the raw smell of masala paste is gone.
Add more water to get the right consistency. Add salt and the tomatoes. Cover and cook till tomatoes are soft but do not loose their form.
Garnish with cilantro and serve with rice, rotis, bread - whatever you like.


This curry is very rich and creamy. I would surely make this when there a some friends over for dinner. The only modification I would make is to omit the tamarind since it makes the curry slightly sour. Lemon juice would be a good substitute. I would also add a few pieces of paneer or red pepper diced. They would nicely complement the richness of the curry.
 Next weekend is a long one for us. Yayy.. the first long weekend of the year is almost here. Am so looking forward to it...  :)
Have a great week ahead !!

Saturday, May 12, 2012

Mother's Day - Photos, memories and more

Pin It Now!
I do not have a recipe today. Just a few stories, photos, thoughts....
 
On Friday morning we had a "Muffins with Mom" event at Aamod's school. Since I was new to such events I was pretty excited about it. Aamod was initially confused as to what the party was all about. But later he was delighted to have me over and showed me some of his best friends at school.  After a small breakfast he handed me a card he put-together. How cute is that !!


 As I drove to work my thoughts raced back to those times when aai would bring us hot meal during the lunch break at school. And that too every single day !! It was like like lunch with mommy every single day. She would walk to the bus stop and then take a bus to the school. And then back again.We often suggested carrying lunch in the morning. But she promptly dismissed the idea. My friends often asked me "Your mom gets you lunch everyday" and when i nodded they would sigh in disbelief.  Such is my aai. Such are all our moms - selfless and caring. 

  Happy Mother's Day to My Mom and to all the Mothers out there !!


Friday, April 20, 2012

Corn with tomatoes and onion

Pin It Now!
This month has been a busy one for us. We had our little one's birthday last weekend. I was busy preparing for the party making sure I do not miss anything. Making checklists, sending out invitations, shopping for decorations etc its exhausting but equally enjoyable, after all our little bundle turns 3. And it was truly a special day for us.We celebrated him, us and all of you who have been with us through out these days.
It seems like just yesterday when he crawled our tiny apartment, easily slipped under the dining table and was just babbling words. Sometimes he seems to me like the caterpillar slowly pushing its head through the shell and realizing his freedom. We miss those days and often wonder when he actually grew up so much so fast.
That was the time when we learned, read and were given a lot of parenting tips and advice from friends and family. Slowly but steadily we put those ideas to use. Some worked some didn't. Some we learned along the way. More often my inner instincts proved right, I have learned to trust them now. We have connected with each other as a family,enjoying each others company realizing how beautiful it is, to just be together. This bonding takes time, love and lots of hard work. But the beauty of all of it is that you never know when it happens.
Here are some photos from the party last weekend :-

The little one adores Mickey Mouse so it was obvious yours truly would oblige him by throwing a mickey mouse themed party.

Cake courtesy - Cillies Cakes . This place makes the most amazing whipped cream cakes. We ordered a black forest but other flavours like pineapple, mango, coffee are also delicious.


After all the partying it was time for a simple and quick recipe that I made as a quick lunch/brunch last weekend. Its a moist curry that can be served with some sliced bread for a quick meal or alongside fluffy indian breads.


Tamatar Varu Makai Nu Shaak
Spicy Corn with sesame seeds and tomatoes
(Adapted from Madhur Jafferey's World Vegetarian)

What's needed:-
1 Can of corn or 2 corn on the cobs with kernels removed
1 onion finely chopped
1 large green or red pepper chopped
2 medium tomatoes pureed
1 garlic clove grated
1 green chille
2 tbsp sesame seeds
1 tsp each of ground turmeric, ground cumin, ground coriander and garam masala
1 tsp chilli powder
1 tsp mustard seeds
1 tsp cumin seeds
3-4 tbsp cooking oil
 handful of fresh cilantro
  • Over medium heat combine the mustard seeds and the oil.
  • When mustard pops add the garlic, green chilli, sesame seeds. 
  • Once the sesame seeds turn brown add the onion and bell pepper and saute till soft.
  • Add the corn with all the ground masalas.
  • Add the tomatoes and salt.
  • Cover and simmer for 10min.
  • Taste and adjust seasnong.
  • Garnish with cilantro and serve hot.

Use your favorite garam masala for this one. I use a homemade one or sometimes the Kitchen King masala. This is a great choice for a side when one has run out of ideas for quick week night curries. Serve this with some crusty bread and you have a whole new meal idea to look forward to. I often make more of these to save for later may be for breakfast with  some buttered toast. 
Have a great weekend !

Monday, March 26, 2012

Something sweet , something spicy

Pin It Now!
We ushered in the marathi new year this last weekend. "Gudi Padwa" as it is locally called in the state of Maharashtra is of the most auspicious days in the Hindu Calender.
Wish you all a very happy gudi padwa !! May the coming year brings you lots of good times !!
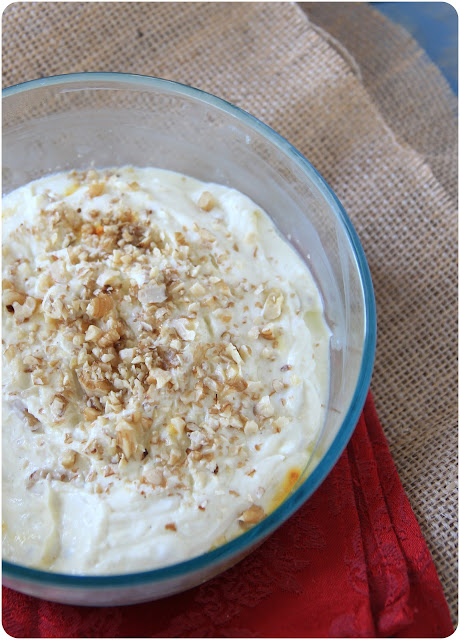
Lets begin the new year on a sweet note, with a generous helping of shrikhand.
Last year or so I posted my recipe for Amrakhand. I got such lovely emails after that post that I could not not post the equally delicious"Shrikhand" . After several attempts I think i have finally learned to make soft, light and fluffy shrikhand.
I make my shrikhand from my scratch. There are 2 reasons - Firstly because there is no place that offers thick yogurt(no Chitales and Kaka Halwais here) .Greek yogurt is an option but that is Greek. And second, more importantly store bought yogurt does not have that slight sour taste that homemade one has.


On to the recipe :-

Shrikhand
(Makes 6 generous servings)

3/4 G of Whole milk (preferably organic)
2 heaped tsp of cardamom powder
1 tsp nutmeg powder
hefty pinch of saffron mixed in 3-4 tbsp of warm milk
2 tbsp of yogurt culture to set yogurt (see *tip below)

Setting the yogurt :-
  • Pour the milk into 1 or more microwavable glass bowls.I use my pyrex or corning ware for this.
  • Microwave the milk until thick cream layer forms at the top. About 6 min with a break of 5 min after every 3 min.
  • Cool the milk until you can easily hold a finger in milk for 2-3sec. Mixture should be warm not boiling hot. High temperatures can kill the yogurt culture and if its cold they will not multiply.
  • Mix about 2 tbsp of live yogurt culture into the milk and mix gently.
  • Turn on the oven light and put the bowl in there, preferably overnight. In winter warm the oven to 180 deg C and then turn it off and then put the bowl in there.
  • In the morning switch off the light and move the bowl to the fridge where it will thicken further.
  • Tie the yogurt in a muslin cloth or a cotton napkin. Hang it as shown in this post so that water drains out. This thick yogurt will be the base of our "Shrikhand".
* Tip - The regular yogurt in American stores do not have live yogurt culture. Try to get it from an indian store or better still from a neighborhood indian friend who makes yogurt.


To make the shrikhand :-
  • In the thickened yogurt add about 1.5 C of sugar.
  • With a hand mixer beat the mixture for about 30s.If the mixture is too thick add a 2 tbsp of milk.
  • The sugar will dissolve and the mixture will loosen so do not add too much milk.
  • Add the cardamom,nutmeg and saffron and fold the mixture gently. Use a spatula if required.
  • Add coarsely crushed walnut, pistachios and serve chilled.
I used around 1.5C of white sugar. If you are using brown sugar that is coarse then run it in the food processor. That way it will dissolve faster.
We like our shrikhand a bit sour and sweet. Increase quantity of sugar by another 1/2 C for more sweeter shrikhand.
Though this recipe  appears time consuming its actually really simple provided you plan ahead. I start almost 4 days in advance and this is the way I plan it.
Day 1 - Set yogurt at night
Day 2 - In the morning transfer the bowls into refrigerator
Day 2 - At night hang the yogurt into a muslin cloth
Day 3 - Make shrikhand in the morning/evening.

Shrikhand can easily be refrigerated for almost a week. Traditionally its scooped up with fluffy pooris, a side of batata bhaji and crispy bhajis (Fritters).

This year I skipped the traditional side of Potato bhaji for this Palakwali Dal. The recipe is from Sanjeev Kapoor's book "How to Cook Indian". 


Palakwali Dal
( Recipe from Sanjeev Kapoor's "How to cook Indian ?")

2 handfuls of fresh spinach chopped
1/4 C + 1/8 C of mung dal washed and set aside
1 tsp turmeric powder
pinch of hing
salt to taste

For the tempering
1 tsp cumin seeds
1 tsp of ginger paste
1 tsp garlic paste
1/2 medium onion chopped
2 green chillies slit in the centre
2 dry red chillies
1/2 tomato chopped

oil to saute
1 tbsp of lemon juice

  • Over medium heat combine mung dal with 3C of water. Add turmeric and salt. Allow to boil and then simmer for until dal is soft but not completely mashed. This takes around 20min.
  • In a saute pan, heat 4-5 tbps of oil/ghee. Add the red and green chillies, cumin, ginger - garlic paste, onion  and saute till onion is soft. Add the tomato and cook further.
  • Add this tempering to the dal. Check for salt and add more if required.
  • Allow to come to a boil.
  • To serve top with lemon juice and some more ghee.
  • Serve with rotis or with steamed rice.
Honestly I did not expect much from this recipe with very simple ingredients. But I was pleasantly surprised when I realized how soothing it was to the body and mind. Loved it all the way and now am waiting to try other recipes from the book. Will keep you posted !

Monday, March 19, 2012

Tikhat Sanja

Pin It Now!
Its been almost 3 weeks since we commenced our gardening adventure in our backyard. It all started when I spotted a small habanero on one of the shrubs. Possibly planted by the previous owner it survived the slashing thunderstorms we had a few weeks back. Though we take no credit for its survival it gave us all the confidence and excitement to get started. So after a quick drive to the local nursery and after several evenings spent in the garden we are now proud owners of a tiny veggie patch. And we cant wait to plant more.This gardening thing is addictive. Who knew ???

On the kitchen front I have for you - "Tikhat Sanja".
  This dish reminds me of my roots ( no pun intended ), my home and the food that aai made with love.Its a breakfast we all enjoy.
Besides home there was another place that served delicious "Sanja". It was called "Janseva Dughdhalay" in the very heart of Pune. This place was famous for a menu of maximum 4 items, its straight faced waiters and above all terrific food. They never served tea/coffee instead flavored milk and even buttermilk was offered. Their "sanja" was mild , slightly sweet and sour. It was soft,almost melting in the mouth.

This is my version , very close to how "Janseva" makes it.

Tikhat Sanja

What's needed : -
3/4 C course semolina or rava
1/2 an onion finely chopped 
4-5 green chillies 
1 tsp ginger grated
2 tbsp peanuts
1 tsp cumin seeds
1 tsp mustard seeds
1 tsp turmeric powder
1 tsp hing
8-10 curry leaves
1/4 C thick homemade yogurt ( preferably slightly sour)
1/2 juice of lemon
1 tsp sugar

salt to taste
cilantro and fresh coconut for garnish
oil as required
2 C hot boiling water (slightly more than twice the amount of semolina)

How to :-
  • Over medium heat combine the semolina with a tablespoon of oil. Saute over med-low heat till semolina turns light brown. Take care not to burn. If the rava is not roasted well then it will not fluff up. Set aside when done.
  • Over medium heat combine 5 tbsp of oil with cumin, mustard,curry leaves. 
  • When the mustard cracks add the green chillies,peanuts and saute for a minute.Then add the onion and wait till turns soft.Add the turmeric and hing (if using).
  • Smoothen the yogurt with a table spoon of water and set aside, 
  • Add the roasted semolina to the onion mixture and mix everything. Add the water and the yogurt. Add salt. Taste the water. It should be slightly more salty and spicy than you want the final product to be.
  • Add the sugar and simmer, cover the whole thing for 5 min.
  • Open the lid and mix. The mixture will absorb water and fluff up, almost twice the original quantity. 
  • Add a squeeze of lemon juice. Garnish with cilantro and coconut and serve hot.

I would strongly advice using sour homemade yohurt here. It helps make the sanja soft and slightly sour. Add a dollop of ghee if you like , it adds to a more homey touch.
Aai would press the sanja into moulds. As kids we would love helping her out with this activity. My favorite topping besides cilantro and coconut is crunchy sev and with some more yogurt on the side this makes a hearty weekend breakfast. 

Friday, March 16, 2012

Black Eyed Peas Curry (Konkani Style)

Pin It Now!
Every so often I get together with my friends ( who are co-incidentally moms) for a moms girls night out (without kids,ofcourse). Its our time to to dress up, chit-chat,to talk about the subjects close to our heart, to catch up what's going on in our lives. More than the meal we enjoy each others company and take pride in this support system. Almost always i find tips, ideas  and answers to tackle so many everyday questions lingering in my mind. One topic that almost inadvertently comes up is parenting. And when that starts a plethora of  other subjects come up - all related to kids. I have learned so much so fast from these conversations.

Cooking is also one of our dear subjects. And we always look forward to this casual recipe exchange.
The next time we meet I will surely rave about this recipe for black eyed peas.

 I love my legumes and I try to have at least 4 different ones on hand. One of them makes its appearance at least one day a week.
Legumes are like the little black dress. They need to be dressed up to look appealing. And that's what I did with this recipe. It needs  a spin in the blender but the result is awesome.

Here take a look :


Now onto the recipe :-

Black Eyed Peas Curry
( From this recipe on Aayis recipes )

1 C black eyed peas pressure cooked ( soak 1/2 C to yield 1C of black eyed peas )
1/2 onion chopped
small lemon sized ball of tamarind soaked and juice extracted
1 tbsp garam masala/kitchen king masala
1 tsp kashmiri chilli powder ( for color, optional )

Spice Paste :-
3 dry red chillies
2 tbsp coriander seeds
2 tbsp dry/fresh grated coconut
2 tbsp of cooked black eyed peas

oil as required
salt to taste

  • In a table spoon of oil saute the ingredients for the spice paste except the cooked peas. Cool and blend with the black eyed peas. Add a tablespoon of water at a time if required.
  • Over medium heat saute the onions and then add the chilli powder if using. Add the cooked peas, spice paste and the tamaring extract.
  • Add salt and water to adjust the consistency of the curry.
  • Add the garam masala and garnish with cilantro.
  • Serve with rotis / rice. Tastes best the next day when the flavors have mingled.

Wednesday, February 29, 2012

Mexican Corn Chowder

Pin It Now!
I try to keep weekday dinner simple but interesting. Some recipes are regular on my weeknight menu. For example , sandwiches. We love experimenting with various kinds of bread ranging from sliced sandwich bread to the rustic ciabatta and hamburger buns.Pair it with  different cheeses and vegetables and the possibilities are endless.
For the spreads I use hummus, store-bought or homemade pesto and sometimes mayo spiked with some indian spices.
We love fried rice and I try to use the nutty short-grain brown rice whenever i can. A small portion is very filling. Sometimes I throw in some tofu pieces along with the vegetables.
When i am craving for an indian meal I quickly put together a stir-fry and serve it with frozen chapatis. I use the ones from costco. It helps keep things sane when the world around is demanding more from you. ;)
These days am learning to make soups.Like this thick creamy corn chowder.Try out the canned chipotle peppers in adobo sauce. I usually transfer the chillies into a jar and store it in the refrigerator. These are very hot chillies so use a very tiny bit to start and gradually increase if needed.


Mexican Corn Chowder

Kernels from 3 ears of corn
1 C milk
3-4 garlic cloves
1/2 large red or yellow bell pepper chopped
1 medium onion chopped
1 tsp cumin powder
5-6 C vegetable stock
1 chili in adobo sauce ( seeds removed and cut )
salt to taste
oil to saute

  • Over medium heat combine the onion,garlic until soft. Add the bell pepper.
  • Then add the corn, stock,cumin powder,milk and chilli in adobo sauce. Let the whole thing come to a gentle boil. Reduce the flame and simmer for 10min.
  • Let this cool. Then process 3/4th of it in food processor. 
  • Add it back to the pot and let it boil. Add salt and  finely chopped cilantro.
  • Serve hot with some crusty bread.

Both of us totally loved this soup. Its so easy to make with a consistency reminiscent of the sweet corn soup that I love, only spicier and more filling.

Tuesday, February 14, 2012

Kishmish wale Choley

Pin It Now!
Just a few months to go and my baby would be all of three years old. 3 years a.k.a 36 months.  The baby that I swaddled to bed in a warm, cozy blanket is stretching his arms and breaking his shell. Till yesterday he fit easily into my arms and sometimes on my shoulder. Now he just jumps down and runs on his own. Yes, my baby is growing. 
 
You know it when they do not need their onesies and the overalls.You know it when the pair of pants you bought last month fits just above the ankles, the shoes get tighter, when its time to get the undershirts and time to say goodbye to the diapers. Their babbles slowly start turning into legible speech They start having their own opinions, their own voice and tastes. Slowly you realize that you would be better off asking them what they want for dinner or for that matter give them the choice.Your evenings get all the more busy, more noisy and perhaps more demanding. 

I often find myself browsing through the pictures on my laptop almost every other day. Wishing I had taken more pictures when he crawled, or may be a few more videos when he uttered those first few words.


Onto the recipe in this post. Its a somewhat sweet and spicy chickpea curry. Chickpea is an-all time favorite for and we can never have enough of them. The recipe uses a handful of golden raisins that provide a sweet-tart flavor to the curry. Try it if you like your curries on the sweet and sour kind.

Kishmish Wale Choley

For onion-raisin mixture :
1 medium onion sliced ( reserve 1/4 of the onions)
2-3 green chillies
handful of golden raisins
2 cloves of garlic
1 tbsp ginger grated
2C boiling water

2C pressure cooked chickpeas or canned chickpeas
1 tsp cumin
2 tsp coriander powder
2 tsp cumin powder

salt to taste
oil as required

  1.  Soak the raisins in boiling water for 20-30min until they are plump.
  2.  In a food processor combine the ingredients for the onion-raisin mixture and pulse into a coarse paste.
  3. Over medium heat combine the cumin and reserved 1/4 of the onions. When the onions are soft add the onion-raisin mixture. Saute till golden and till some oil separates from it. Add water a tablespoon at a time if the mixture dries up so as not burn the mixture. Around 7-8min
  4. Add the cooked chickpeas and water to loosen the curry. Season with salt, cumin powder and coriander powder. Add you favorite garam masala if you like. I did not add any.
  5. Taste and adjust seasoning. Serve with fresh rotis or with some crusty bread.


Sunday, January 15, 2012

TilGul for Sankranti

Pin It Now!
The first indian festival is already knocking on my door. Am i ready to bring it in .. ?  Makar Sankranti is all about creating warmth to slowly recover from harsh winter that passed by. Its the time to enjoy the last of the chilli evenings before the days slowly get longer. 

In India, sesame seeds and jaggery are consumed generously in winter. When its cold outside they are supposed to create warmth on the inside. Isnt it almost magical that our festivals, seasons and the foods we eat are so much in cognizance ?  I remember aai also made gulpoli and bajri bhakri. All out of the world !! And with no calories to watch you could have it till your stomach's full and your heart's contented.


Today I share with you the recipe of Tilgul wadi ( sesame and jaggery squares ). Its very easy assuming that you can move fast in the kitchen.


Tilgul ( Sesame and Jaggery Squares)

1 C sesame seeds roasted and coarsely crushed
1/2 C peanuts finely crushed
1 C jaggery 
2 tsp ghee
pinch of cardamom powder
2 tsp milk

  • Line the back of  a baking tray with aluminum foil. Grease with melted ghee.
  • Over medium-low heat combine the ghee and the jaggery. In about 2 min the jaggery starts to melt.
  • Continue breaking it using the back of the spoon till it becomes pasty and falls freely from the spoon.
  • Now add the cardamom,sesame and peanut powder and mix as fast as you can.
  • Dump the entire mixture onto the greased baking tray lined with foil.
  • You can cover the mix with a plastic wrap and then try to form a ball of it so that it can rolled easily with a rolling pin.
  • Spread to desired thickness, typically about 1/4inch thick.
  • Allow to cool for 5-10min and cut into squares.
  • Cool completely before the breaking the squares apart. You will see that the mixture will harden considerably
  • This makes around 15-20 medium sized squares.
Tilgul ghya goad goad bola !!
Enjoy !!

Monday, January 9, 2012

Eggplant with mint , coriander and garlic

Pin It Now!
Happy new year !! We are well into the 2nd week of the new year but its never later to send out warm wishes. After all if you stopped by to find out what's up with me then i do owe you the warmest wishes ever. So here's wishing you a happy and contented 2012 !!

We have been enjoying our new house specially during the holidays. Aamod loves riding his trike and there is definitely more space for his toys. Several friends have been coming over for lunch, dinners and tea , so my kitchen was incredibly busy. And I love that. We have all nicely settled down into our routines so to speak. Aamod seems to be having a good time at school too. Yes, there are some sobs and a few tears in the morning. But I love the hug and the grin when I go to pick him up.

We spend a lot of time playing with him. I generally wrap up dinner and the kitchen chores early so that I have some worry-free time with him. He makes us dance, jump and even run. He's learning every moment and we are learning from him too. His concentration and focus has always amazed us. I realized that the older we get the more distracted we are and so difficult it is to concentrate. That's good in one way since we are able to multi-task but it reduces our patience.

After all the holiday indulgences lets get back to some healthy food. This simple eggplant saute surely makes a satisfying meal with some whole wheat rotis. The trick is to cook the eggplant just right  without adding too much water.

If you love the freshness of mint in your food then this one is for you. We love mint in almost all things tea, pestos and stir-fries.


Eggplant with Mint,Coriander and garlic
(Recipe from eCurry)

What's needed :
7-8 medium sized eggplants ( washed and cut sprinkled with salt and soaked in water )
1/2 an onion chopped
1/2 bunch of mint ( tender leaves and stems only )
2-3 chilli pepper
3-4 cloves of garlic
2 tbsp coriander seeds
1 tsp chilli powder
5-6 tbsp of oil
salt to taste


How to:-
  • Make a paste of mint,coriander and garlic and set aside.
  • Over medium heat combine the onions, chilli pepper and saute till translucent.
  • Add the drained eggplants and allow to brown. Don't allow it to becoming mushy. Around 3-4 mins on medium-high heat.
  • Now add the mint,coriander and garlic paste. Also add the chilli powder,salt and turmeric.
  • If the mixture dries out add a splash of water just to clean out the pan.
  • Simmer and cover for 4-5 min or until the eggplant softens up.
  • Add more mint and serve hot with rotis.

This a dry vegetable stir fry with not much gravy. So like I said earlier, do not add a lot of water.  Just enough to cook the eggplant mixture. The original recipe uses tomato but I forgot about it and realized it only later. Use it if you like.

Enjoy the rest of  week and hope to see you soon !