Monday, December 5, 2011

South Indian Style Noodles

Pin It Now!
I love this time of the year. I love everything about it. The weather-slightly cold but not  bone-chilling. The fondly decorated homes, the dazzling lights, the stores, all decked up with wreaths, bows welcoming the enthusiastic shoppers.
This year we put up a Christmas tree in the living room. We decorated it with cute little ornaments and even got some artificial snow to throw on it. It enlivens the holiday spirit. Now all we need is the holidays to arrive as fast they can !!

These little things in life make me so excited and happy. And then there's something else that makes all three of us really happy. Its this bowl of these spicy noodles. I tried  something similar at an Indian restaurant here and attempted it at home.


South Indian Style Noodles

What's needed :
1/2 a packet of Spagetti ( I use Barilla brand)
1C of julienned vegetables red,yellow,orange peppers, onions, cabbage (use any combination of these in any proportions)
4-5 tbsp tomato puree ( substitute with pizza sauce or see note at end to make quick tomato puree)
3-4 curry leaves

1 tsp cumin
2 tsp of sambhar masala
1 tsp ginger-garlic paste
salt as per taste

water as needed to boil pasta
olive oil as needed

How to :
  • Boil the pasta in salted water for 10 min or as per package instructions. Drain and set aside.
  • Over medium heat combine the 4-5 tbsp olive oil, add curry leaves and cumin. Saute till sizzling for 1 min.
  • Add the sliced onions, ginger garlic paste and cook for a minute or two.
  • Then add the rest of vegetables and cook till tender  wilted but still crisp.
  • Add the tomato puree/pizza sauce and sambhar powder. Saute till the mixture leaves oil on the sides. Cook till mixture is lumpy.Add salt.
  • Add the noodles and give a good mix to blend in with the sauce.Taste and add more salt or red chilli flakes (to make it more spicy).
  • Top with more olive oil and serve.
Tip - To make a quick tomato puree, microwave 2 tomatoes in a bowl of water for 3 min or more until the skin peels off. Cool, remove the skin and give it a quick chop.
We all love such off-beat dinners. We had this with some tomato soup on the side.


And the leftovers were enjoyed from the lunchbox the next day.

Wednesday, November 30, 2011

Spiced Pistachio and Cranberry Muffins

Pin It Now!
For what I thought would be a short break turned out to be quite a hiatus from this blog space of mine. Things got a lot busy than I had expected. Life literally opened new doors We moved to a place we now call home and so, we were busy with all the things that come in the process. We bid farewell to some very good friends in hope of meeting new ones in other part of the town.


Now that I have a bigger kitchen I have all the more motivation to cook and bake. And am doing just that, specially when i need a break from the seemingly endless unpacking.
One morning I somehow got fed up  tired of my oatmeal and blueberry breakfast and declared we needed a change. And so I tried making muffins the first time ever. 


Spiced Cranberry and Pistachio Muffins
(Recipe from here)

What's needed :

2 C all-purpose flour
1 tsp baking powder
1 C dried cranberries
3/4 C + 1 tbsp turbinado sugar
1/2 C pistachios chopped
2 tsp ground ginger
1 tsp ground cinnamon
1/2 tsp ground cardamom
3/4 C buttermilk
1/2 C vegetableoil
1 egg lightly whisked

How to:

  • Preheat over to 390 F. Line a muffin pan with paper moulds. Spray with oil so that muffins do not stick.
  • In a bowl mix all the dry ingredients - flour,baking powder, pistachios,cranberries and the spices.
  • In a another bowl mix the wet ingredients.
  • Make a well in center of the dry mixture and pour the oil-buttermilk-egg mixture in it. 
  • Gently fold in the dry mixture till everything is moistened. Do not over mix. Stop when you do not see any dry flour.
  • Scoop the mixture using an ice cream mould or a spoon into the muffin cases.
  • Bake for 20min and until a toothpick comes out clean.
  • Serve warm with butter or jam.

We had ours warm brushed with some jam. They were so good that we finished 2-3 of them right out of the oven. And my breakfasts - they are no longer boring. A warm muffin with warm glass of milk or hot coffee. Perfect start to a cold day.

Monday, September 5, 2011

Rajasthani Gatte Ki Sabzi

Pin It Now!
There are times when I love being where I am and there are times when I just want to run back home. Back home to the place and the people I grew up with and  to the festivals we celebrated. Yes, its the time when Ganpati Bappa has arrived bringing with him so much joy and love.

Both aai and baba would work very hard during these days. There was so much to be taken care of around the house. Starting with the decorations, the puja and the elaborate cooking. My sister and me were their little helpers. We would make garlands out of the sweet smelling flowers just brought out from the market, help mom to make the modaks, make rangoli in front of the house and so many small household chores. Every evening around eight we gathered for the aarti.Yes, festivals were busy times. 


This weeks recipe is from the colorful state of Rajasthan - Rajasthani Gatte ki sabzi. I saw this recipe grace several blogs and books and wondered what was special about it. Chickpea flour dumplings in a spicy yogurt sauce. How good can it be ? 


Heart and Tasty recipes like these are specially popular in places where vegetation is scarce (like in the desert).But you do not need to live in a desert to enjoy it.

Rajasthani Gatte ki sabzi

For the chickpea dumplings :
1 C chickpea flour
1 tsp each of cumin powder, chilli powder, turmeric,coriander powder,garam masala (Use more for a spicier gatte)
1 tsp ginger-garlic paste
salt to taste
1/8 C yogurt

For the yogurt sauce :
1C yogurt
1 tsp  each of of cumin powder, chilli powder, turmeric,coriander powder,garam masala
1 tsp ginger-garlic paste
1 tomato chopped
salt to taste
1/4 C water
 
For the gatte :
  • In a bowl mix the ingredients for the dumpling. Add the yogurt in batches of 1 tsp to pull the mixture together into a dough. The dough will be sticky and slightly unmangeneable. Use oil if  it sticks to your hands.
  • Divide the dough into 4 equal parts and make 1 inch logs and set aside.
  • Bring a pot of water to a rolling boil. Add the the logs to the water and let cook for 30min.
  • After around 20min the logs will swell up and become shiny on the outside. Drain after 30-35 min.Cut into pieces and set aside. You might need more time to cook if you are using a larger quantity of dumplings.

For the sauce :-
  • Over meadium heat combine the cumins seeds, turmeric and chilli powder.
  • Add the tomatoes and saute till soft.
  • Add the chick pea dumplings or the gatte.
  • Add the ginger, garlic paste, garam masala, coriander and cumin ppowder, salt to the yogurt and mix well.
  • Lower the heat and add the yogurt. The yogurt might curdle if added at high heat so it essential to reduce the flame and mix as soon as the yogurt is added.
  • Add 1/4 C water to thin out the mixture if required.
  • Cover and cook on medium-low heat for 10-15min.
  • Garnish with cilantro and serve.

Tastes best a few hours after its make or even the next day. We loved it with some fluffy rotis and hot rice.
Have a great week ahead !!

Wednesday, August 31, 2011

Mysore Rasam

Pin It Now!
My earliest association with south indian food begins with my mom. She spent a good part of her childhood in South India. Mom learned a lot of cooking from her grandparents and from her andhra neighbors -  various types of sambhars, rice, idli, dosas were very popular with her. 
When we were kids, aai would often cook bisi-beli bhath, lemon rice , mango rice and serve them up with tales from her childhood. We loved listening to her stories, her eyes full of pride and excitement. She told us about the huge bunglow they lived in, the mango tree in the backyard from where they would pick close to a thousand mangoes every year, the pet hens and how she searched for the eggs in the nest and then sell the eggs making no profit, about the dog in the house that would eat sambhar and rice and went mad one fine day. Yes, I have heard these and many other stories almost a hundred times.Those were happy days she would say. 
So when I visit Pune, next time I am sure to make this Rasam for my mom. To have it with some dosas or idli accompanied with generous helping of her stories of course ! This recipe is from the book Dakshin by Chandra Padmanabhan. 


Mysore Rasam
(From Dakshin by Chandra Padmanabhan)

1/2 C toor dal (cooked and set aside)
Tamarind Juice from a lemon sized ball of tamarind
2 tbsp fresh or dry coconut
1 tbsp store bought rasam powder or mysore rasam powder (recipe below)
1 tomato finely chopped 
1 inch piece of  jaggery
1 tsp turmeric powder
cilantro to garnish

For the paste :
1 tbsp coriander seeds
2 dry red chillies 
2 tbsp dry or fresh coconut
-Grind the above to a paste with very little water and set aside

For tempering :
1 tsp mustard seeds
2 dry red chillies
1 tsp cumin seeds
10-12 curry leaves

Mysore Rasam Powder
1 tbsp coriander seeds
4 black peppercorns
1 tsp cumin seeds
1/4 tsp fenugreel seeds
5-6 curry leaves
3-4 dry red chilles
1/2 tsp turmeric powder
-- Roast the above spices till warm and aromatic. Blend into a fine powder.
This makes masala enough for the above quantity of rasam.

oil as required
salt to taste

How to :-
  • Over medium heat combine the oil and ingredients for tempering.
  • Once the mustard splutters, add the tomatoes and saute till pulpy. Add the turmeric powder and the tamarind juice.
  • Let this mixture cook for a 15-20min. If it becomes too dry add some water.
  • Then add the cooked dal and jaggery and mix well. Thin the rasam as required by adding water.
  • Add salt and taste.
  • Add the paste and get the rasam to a boil. Garnish with cilantro.
  • Cover and open only when ready to serve.

The rest time makes the rasam all the more tasty so make this well ahead of time.
The recipes in the book use a whole lot of curry leaves so I am seriously considering planting a curry leaf  plant in my patio. :)

We are approaching a long weekend. Hope the weather provides some relief and we get to enjoy some of the outdoors.Have a good weekend !!

Sunday, July 31, 2011

Green Squash in Peanuts-Sesame gravy

Pin It Now!
This space has been quiet for almost 3 weeks now. Behind the scenes my days were filled with babbles from the little one's baby talk and laughter.Overall life is moving at a steady place. Or so it seems on the outside.

But what about the mind, the heart ? Are they at peace ? My mind has been wandering like a stream of water flowing down a cliff. Finding its ways through whatever little space it finds between the rocks. I am filled with thoughts from the past, the present and the future. Several times during the day I find myself at the same place where mom was almost three decades ago. It seems I have stepped into her shoes and seeing the life as she has seen it. My then innocent mind failed to understand so many things she said to me, things she asked me to do. But I can justify all of them so much today. 


Mom always cooks  simple meals using fresh vegetables and essential pantry ingredients. Not very fancy and exotic but rather simple and homely. With her own unique touch. 
This squash curry with peanuts and sesame gravy would be something that mom would definitely like in her repertoire. Its devoid of hot spices and ginger-garlic(satvik) but still tastes divine.


Squash in Peanuts and Sesame gravy
(Source: 660 Curries by Raghavan Iyer)

To make into a dry paste/powder:
1 tbsp sesame seeds
1 tbsp coconut  flakes (dry)
2 green chillies or dry red chillies
1 tsp cumin seeds
Fry above ingredients lightly.Set aside
1 tbsp tamarind paste / or water from a quarter sized ball of tamarind)
1 tbsp peanuts

1 big green squash ( hara kaddu )
1 tsp turmeric 
1 tsp mustard seeds
1 tsp cumin seeds
1 tsp chilli powder
3-4 curry leaves
salt to taste
oil as required

  • Grind the sesame-coconut mixture with the peanuts to make a fine powder. Add the tamarind extract and make a thick paste. Do not add water.
  • Over hot oil combine the cumin and mustard seeds.Add the curry leaves and the turmeric. 
  • Quickly add half of the sesame-peanut mixture and saute for 10s. 
  • Add the squash pieces and mix everything till the squash is coated with the powder. 
  • Add the rest of the powder. Add 1/2 C water and allow the cover to allow the squash to cook.
  • This will take around 10min.
  • Once the squash pieces are tender , add salt and adjust consistency of the gravy.Add chilli powder if  required.
  • After the curry boils switch off and serve with rotis/rice.

We were surprised how a curry without the usual garam-masala and ginger-garlic taste so very flavorful. We had it with rotis for a satisfying weekend lunch.


Sunday, July 3, 2011

Gajar,Gobhi Aur Shalgam ka saag

Pin It Now!
Weekdays for me are spent meeting one time deadline after another. As the clock strikes 7AM the race begins. Every now and then I look at the red clock in our living room to ensure I am not running very late. Do I have enough time for breakfast ? Ohh how is the traffic today. What do i make for dinner ? and the questions in my mind just continue.
So I simply love long weekends like the these. No early morning rush. A few minutes more in the cozy bed wont hurt. And no struggle to wake up our toddler too. He can sleep as long as he feels like.
I love celebrating these days by treating ourselves to some indian breakfast. Pohe, upma, idlis and sometimes even cinnamon toast are usually on the menu on weekends. And add to that a cup of masala chai or even adrakwali chai. And breakfast is served right !!

However on the menu today is a curry that can be served at a homey lunch.I saw this recipe on zee tv 's khana khazana last week or so. It looked simple but an intresting composition. Just a few spices like cumin, ginger and turmeric complement the sweetness of the root vegetables. We had it with rotis for a filling weekend lunch.


Gajar, Gobhi Aur Shalgam ka Saag
(Recipe from sanjeevkapoor.com
What's needed :

2 medium carrots diced
1 turnip or daikon root grated ( can be replaced with 2 to 3 red radishes also)
1 of cauliflower grated
1 medium onion finely chopped
1 tbsp ginger
3 green chillies cut into 3 to 4 pieces
1 tsp turmeric
2 tsp cumin
salt to taste
oil to saute

1. Over medium heat combine the oil and cumin and wait till the seeds sizzle.
2. Then add the onion, turmeric and saute till translucent.
3. Then add the green chillies, ginger and the vegetables.
4. Add 1/4 C water and cover and cook till vegetables are tender.
5. Add salt and mix in a handful of cilantro. 
6. Taste and add more seasoning if required.
5. Serve with warm rotis. 

This tasted really good. I love that the saag uses so much of the fresh produce readily available during summer. And its super-easy isnt it ??

Have a great week ahead !!

Sunday, June 19, 2011

A week's trip to Seattle

Pin It Now!
We were there for a week and the city captivated us with its pleasant weather and natural beauty.The cool weather, the numerous lakes, thick green forests, snow capped mountains,walking trails, good food and wine -there's so much that this place has to offer that 6 days seemed too short a time.

The city has several small farmers market. A  treat for food lovers like me. We feasted on fresh fruits something we missed at Houston.

And a visit to the winery was certainly not to be skipped.  

We spent a lot of time with family and friends some of whom I met after almost 5 years.
A life's worth of memories made.
Have a great week ahead !!

Friday, June 3, 2011

Celebrating 6 years of togetherness

Pin It Now!
Its been exactly 6 years since Vijay and myself tied the knot. I still remember that bright sunny day, the decorated venue , the colorful sarees and so many little things from the ceremony. I had mixed feelings of anxiety, joy coupled with lots of curiosity as to what my life would be after that day. They were the feelings of every young girl, about to step from a carefree world to a world of responsibilities.
But am happy - for what the last 6 years have offered us. They were eventful in many ways.We moved around a few places, changed jobs and finally settled down here in Houston.
Life rewarded us with a whole lot of good friends who have been so very kind to us. And last but not the least Aamod entered our lives.

Hope the next six years are full of more good times, and then the next six and the next six.........

Thursday, May 26, 2011

Organizing 101

Pin It Now!
After all the boring de-cluttering its time to move on to something interesting.

Organizing - Assigning everything a rightful place in the house. A close friend taught me - Organizing does not have to be expensive.Yes, it can be tricky. But with some tips to start off you will be a pro in no time.

And remember the tasklist I told you about.Its made on this little dry erase board. A find at walgreens.Its a great investment for busy people. I saw this at a friend's place and loved it.

Toys 
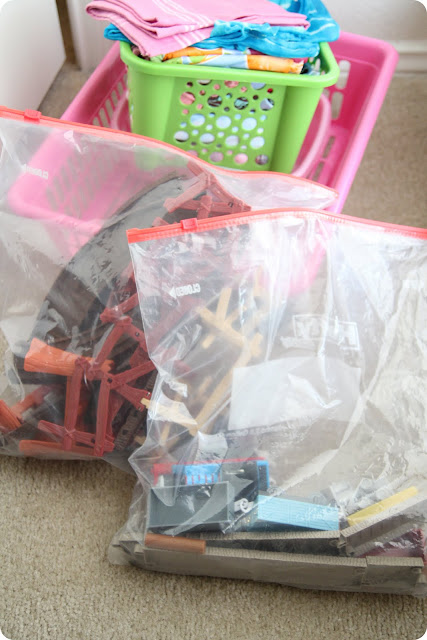
Next came the toys. Aamod has several sets of legos, puzzles that he loves to play with. I store each of these sets in 2Gallon or jumbo sized zip lock bags. 


These are then be put away into a large plastic box. So far its worked out well for him. He loves opening and closing the zip locks  and even puts them away when he's done with them. Overall he seems quite happy about this arrangement. Who knew ?


I also sorted the toys by type. For instance the balls were together so were the other miscellaneous smaller toys. You dont have to buy pretty containers for that. Use what you have. Like I used this tall plastic box that serves the purpose.


 Extra clothes 
I stored Aamod's extra clothing into storage bags that I got from dollar store. They are not super quality but they do the job well. Am sure other stores would carry them in better quality.


You see the box on the left. It holds all the party supplies leftover from Aamod's birthday party. The top shelf of closets is perfect for items such as these that are sparingly used.

Shoes 
We had several pairs of shoes occupying the floor of our shoes and jacket closet. This hanging shelf uses the vertical space to store all our shoes. Now the floor can be used to store other things like vaccum cleaners, strollers etc.


Another great alternative is to use an over the door shoe organizer. You dont have to use this organizer for shoes. Check out where all you can use it here - 10 things to store in shoe organizer.

Going Green
We have also dropped the grocery store plastic bags and switched to cloth bags. A set of 5 bags from walmart cost about $2.50. They are more than enough for our family of 3.


This frees up the space under the sink where we trash all the polythenes. And we all feel good about it too. I keep them in the car and its only a matter of habit to remember to take them along.

Refrigerator Baskets
I got one of these from walmart and the steel one from Goodwill store for $1.50. 

These are especially useful if you have lot of frozen stuff that falls off when you open the freezer door. Avoids serious accidents when you have little ones running around. 

Basket,Bins and Totes
These are a great organizing tool. Get pretty ones for the outside such as in the living room and dollar store ones where you just want some organizing, like this one under the sink.
 
It stores all the items for cleaning. They can hold a lot of stuff and still look great. 


This red one cost me 7 bucks at HomeGoods and was on sale that day.So be sure to invest wisely. 

Canvas Totes or baskets are great for clothes. Walmart, Biglots carry them for a reasonable price.They are light and look great too. Be sure to choose colors that match the rest of the room. Use separate color totes for multiple kids.

Reorganizing
I had a dresser in my hall to hold stuff like stationary, bills etc. I now use it to hold Aamod's clothes. Some clever reorganizing frees up space and makes full use of existing furnuture. Same goes for book racks, cubes etc.

The crux here is to keep is to group items together. For instance this narrow shelf in our bathroom that holds personal items.

And this is defintely not all. I am sure there are lots of ideas out there. And it all depends on personal taste and habits. As for me , I still have lots to work on.

And finally...

Your house is your home - a special place to call your own. Its a place where you can be yourself and so can the kids. So do not be too finicky about the arrangement.After all your home is not a model home. Things will scatter and messes will be made. Be prepared to readjust and revisit as per personal preference. And ofcourse do not stress out too much.

Where we love is home - home that our feet may leave, but not our hearts. 
 ~Oliver Wendell Holmes, Sr.

A big thank you to my friends D,A,Z for all the inspiration and motivation. You all know who you are and I love you a lot !!

Drop me a comment if you have questions, comments or more advice for me. I would love to hear from you.

Tuesday, May 24, 2011

Mission Decluttering

Pin It Now! For the past few weeks I have been actively de-cluttering and organizing my home. On the way, I taught myself a whole lot of new things. It was tiring but a lot of fun, and utterly satisfying. These are some of my lessons learned that may help some of you in your next organizing project.

My goal was to make my home - neat,spacious and definitely more organized.

The first step was to ask myself questions- lots of them.What do I want to change ? What is creating the clutter ? I looked around and the answers came right back.

There were lots of things that needed de-cluttering. For instance, Aamod's toys. So many were broken and not used. I donated a big bag of them and trashed several. I now have only the toys that I want to keep. Less stuff to keep means more space and easy organizing.Ditto with shoes,clothes,zip lock containers etc.Closet and cabinet space is precious real estate that should be wisely used.

I cannot stress how important this step has been. In fact I plan to do it every few months. If I cannot decide if something needed to go or stay I follow the 3-6 month rule. I store it away and if I do not recall or use it for 3-6 months I probably do not need it.

Another trick I learned is to start with small spaces and small projects. I am a working mom and I can only devote so much time to my home. I planned to do a few tasks( may be 2 or 3 small ones) every weekend. That way I do not stress out and lose out on the fun. Make a task list and target it over a few weeks.

I also realized that its not easy to let go of things. Specially toys, clothes - that have been so fondly bought and even gifted.But believe me when you see your clean, organized home it will be all worth it.

Coming up next - are clever ideas to organize your home. Don't head to the IKEA store unless you read this.And this one will be a picture post, I promise.

Saturday, May 14, 2011

Rajasthani Panchmel Dal

Pin It Now!
 You know what I got on mother's day ? This... 


And for someone who never expected this, it came as a very pleasant surprise.


As mothers we know that we are being appreciated and loved, but its nice to see the feelings being expressed.


Needless to say I was deeply touched.

Coming back to the recipe of the day. This Rajasthani Panchmel dal is mixture of 5 dals ( though I only used 4 to make this..lol). Its cooked in fragrant spices and then tempered to give a nice smoky flavor. This recipe was a great find as its perfect for daily dinner rotation.


Rajasthani Panchmel Dal
(Inspired from this recipe on MharoRajasthanrecipes.com)

What's needed :
2 tbsp each of toor dal,masoor dal,mung dal,chana dal and green whole mung dal ( i did not have the last one)
1/2 medium onion finely chopped
1 tomato roughly chopped
1 tsp ginger-garlic paste
2 tsp cumin powder
2 tsp coriander powder
2 tsp garam masala
1 tsp or more of chilli powder
1 tsp turmeric powder
salt to taste

For the tempering
1 tsp mustard seeds
1 tsp cumin seeds
1 or 2 dry red chillies or green chillies

oil as required

How To:
  • Soak all the dals for at least 10mins and set aside.
  • Over hot oil combine the ginger-garlic paste and the chopped onion until onion is soft. 
  • Add the tomatoes and the dry powders. Saute till the mixture is fragrant and leaves oil.
  • Add the dal plus 5C of water. Allow the dals to cook. This may take around 30min.
  • Optionally you can transfer mixture to a a pressure cooker or rice cooker to speed up the process.
  • Once the dal is cooked, over hot oil combine the ingredients of tempering and add it to the cooked dal.
  • Add salt and taste. 
  • Serve with rice , rotis or like I did with dosas.
"This is the only dal you should make" was Vijay's remark. We all love thick and hearty stews.


But like I said this is a very hearty dal with bursts of spice, since the dals are cooked with the spices. Hearty and smooth because of the heavy dals like chana dal and toor dal. A perfect accompaniment to any meal and also to the rava dosas I made this weekend.


Have a great weekend !!

Saturday, May 7, 2011

Brown Rice and Mushroom Burgers

Pin It Now!
These brown rice burgers are so good that you would forget every other veggie burger you've had so far. No, Really !! Actually I made almost 12 of them a few weeks back and we finished all of them in a matter of week. They stay so well in the fridge and are great for snacking and as a meal. 


 I accidentally overcooked my brown rice the other day resulting in rice that was mushy and sticky. I get my short grain brown rice from Whole Foods in the Bins section. But I have seen it many kroger stores also.


 Wondering what to do with it I looked on the internet for inspiration. Found this recipe. We loved it from the very first bite. 
I made them again to take them out for a picnic at the park. 


Brown Rice and Mushroom Burgers
(Inspired from this recipe on ecurry)

1 C cooked brown rice ( 1/2 C uncooked short grain brown rice )
4-5 mushrooms chopped
4 tbsp coursely crushed almonds/almond meal/ crushed walnuts
2 cloves of garlic minced
1/2 medium onion finely chopped
1 tsp red chilli flakes
2 tbsp sricha sauce or your favorite hot sauce
sooji/cornmeal/breadcrumbs as required
salt to taste
oil as required

  • Cook the brown rice with 2C of water (1:4 ratio of brown rice to water). This will yield sticky and mushy brown rice since this is the main binding agent. Allow to cool and set aside.
  • Over medium heat combine the garlic, onion and cook till onion browns up. Add the red chilli flakes and black pepper.
  • Then add the mushrooms. Cook on high heat till the moisture dries up and mixture is dry and lumpy.Set aside.
  • In another bowl combine the rice and the crushed nuts, sricha sauce and salt. Add the mushroom mixture.
  • Combine everything and refrigerate the mixture for 20 min.
  • After 20 min. form the mixture into patties. If the mixture is dry add a tsp of water or mix it with wet hands. Wet hands will also ensure that mixture does not stick to your hands.
  • Roll the patties in sooji/cornmeal/breadcrumbs and shallow fry till golden brown and crispy.
  • Assemble into a burger or have them on their own.
 These are very filling and really addicting. The brown rice is all nutty and crispy. Like I said these can be made ahead and refrigerated for a week at least. Do not skip the nuts. They are the little bites that add to the texture. 
I served them with some chipotle mayo. Its just chipotle in adobos combined with mayo. Really good !! Your favorite dip would work too,
Serve with some salad and lemon wedge for a complete meal.

Sunday, May 1, 2011

Panchphoran Aloo

Pin It Now!
Indulgence for some is having a pedicure, for some it is a piece of dark chocolate and for others it might be a branded pair of jeans. My indulgence is shoes - not just any shoes, but a comfortable, trendy pair of my favorite brand. What is your indulgence ?
Panchphoran is a magical mixture of seeds - aromatic and full of flavor. To create this mix equal parts of mustard , cumin, methi ,fennel seeds and another spice called radhuni. Radhuni is not easily available here so I omitted it.
I made this simple but flavorful aloo sabzi this weekend. I tasted it at a potluck party and loved it. Thank you dear Z for such a tasty recipe.

Panchphoran Aloo

What's needed :

3 medium potatoes cooked chopped ( can use whole baby potatoes too)
1 tsp ginger-garlic paste
2 dry red chillies
1 green chilly
2 tsp cumin powder
2 tsp coriander powder
1 tsp turmeric powder
1 tsp chilli powder
3 tbsp oil
1/2 an onion sliced thinly
2 tbsp thick yogurt
salt to taste

For the panchphoran tempering :
1 bay leaf
1 tbsp panchphoran
3 tbsp oil

Cilantro to garnish
1 tbsp garam masala

  • Over medium heat combine the oil,green chilly,dry red chillies and ginger garlic paste.Then add the onions and saute till soft. 
  • Then add the spices - cumin,coriander,chilly and turmeric powder. If mixture becomes too dry add 3-4 tbsp of water.
  • Add the potatoes and coat them with the spice mixture.Add 5-6 tbsp of water to thin out the gravy.
  • Do not add too much water at once. 
  • Lower the heat. Smooth the yogurt and add some of the gravy to it and add this to the gravy.
  • Add salt, pinch of sugar and allow to come to a gentle boil. 
  • The gravy will thicken slightly.Taste and add more seasoning if necessary.

For the tempering:
  • In hot oil add the panchphoran and allow the seeds to sizzle. 
  • Add this to the potato mixture along with the garam masala and the cilantro. Mix well.
  • Serve hot with rotis.